Friday, January 9, 2009

Building a Pirate Ship - Part 9

Part 9:


Prime and paint the ship.


In this installment I will cover the steps required to prime and paint your Pirate Ship model.


Preparing the model:
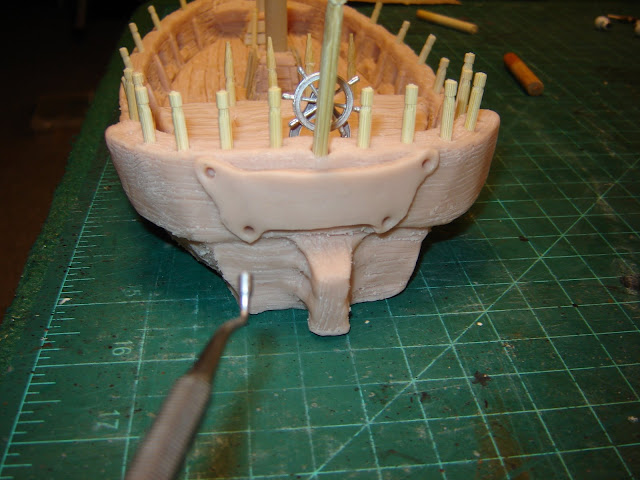
Once the model is fully cooled after baking, you will need to take a few minutes to clean up the model.
  • Remove the temporary mast, and test fit the permanent mast. You may need to drill out the hole a bit, but do not enlarge the hole. Later you will slightly tapper the bottom of the mast.
  • Remove and glue any loose posts, on the gunwales, allow time to dry before priming. Use Allene's Fast Grab Tacky Glue for best results.
  • Remove the mast support posts, assuming they are loose. My support post had been loose, so I opted to set them aside in a egg cart like storage container.
  • Remove the Captains wheel and set aside. Remove the wheel stand if it is loose, if you used string as I did, it should not be loose. Take care not to paint it too much with the base coat.
  • Sand the bottom of the model if any wood pieces are showing.
  • Clean any rough clay, as a result of the wood grain effect. Do this by running your fingers across the model surface. You will find that little tiny pieces of clay will come loose. You do not need to use tools or sand paper for this step.
Remove the Quarterdeck:
With very little effort the removable quarterdeck should come loose. You may need to use a fine edge clay knife along the seams. Do this very carefully taking your time. Hopefully you will not need to cut to free up the quarterdeck area. If you must cut, be carefully not to snap the exacto blade, Sculpey is stronger then you may guess.

Test fit the deck guns:
Test fit your deck gun at each gun port. Mark any areas that need filing. File any gun ports as needed. Again, hopefully you will not have to cut or file too much.


Prime the model:

Let any glue dry as required.

Use acrylic paint to prime your model. I prefer black, applied with a large stiff bristle brush. You may use spray flat acrylic if you like, however make sure you have proper ventilation and a painters mask.

Prime the model and allow time to dry. I generally allow the model to sit overnight.


Spot prime as needed:
Inspect the model and spot prime any areas that are not fully covered. You want the black to fully cover all those little cracks and rivets.

Allow to dry as needed.

=> Note the storage container that holds the wheel, bow spar, flag staff, and support posts for each of the masts.


Select your color scheme:
Select your ships color scheme. For example, a Ghost ship could be gray and weathered, a Naval war ship could be very well kept, with fresh bright colors.


Pirate ships as a rule, would fall somewhere in between. I like to make most pirate ships, "fairly" well kept, yet showing signs of wear and tear or even some battle damage.

I have selected to have this ship, well kept with a darker blend of wood and bright highlights to contrast the dark wood. Dark sails and red and black rigging, with the custom Wolf artwork on the sails.


Apply the Base coat:
As a general rule, most artists will not start with models finish color. In fact, most artist will agree that you should begin two or three shade darker. With a black primer, by intent I must apply more coats to bring "light" back into my model. The contrast of light and dark is what gives your model life.

I selected Burnt Umber as my base coat.


Using a dry brush, touch the edge of your paint and then apply the base coat on the hull and decks. Do not try to cover every rivet hole and crack, most of the little cracks and rivets should remain black. Let the model dry!


Dry Brush:
Using your base coat again, dry brush the model. Keep the brush dry and hit only the main surface areas. Since your first base coat had to overcome the black primer, using the same color for a second coat will make the model appear as if you used a lighter color. Let dry!


Detail posts and supports:
Prime and base coat any support pieces. Glue the support pieces in place. Since the piece are small, I prefer to glue them in place after priming and base coating them.

=> You can later add details to the posts and support if you wish to have the support pieces stand out from the wood of the main deck.


Prepare the Bow Spar:

The bow spar and flagstaff should be lighly snaded before painting them. Appling paint even in thin layers will make it dificult later to insert and remove the bow spar. It is best to sand the tappered end now, then apply the prime and base coat.


=> Often times I use a different base coat on the flag staff and bow spar. In this case the base coat is Red Iron Oxide, applied with an even coat of paint.


Add a lighter shade for highlights:

At this point, your model should have dark areas and some that are visually lighter. I have used a Red Iron Oxide to lighten the model. First with a mix of Burnt Umber, then a second coat with just Red Iron Oxide, applied with a very dry brush. Burnt Sienna works good too in place of Red Iron Oxide.


Again keep the brush dry. Both coats are only lightly dry brushed on the main deck areas, the bow and top edges of the hull.


Let dry.


With the dry brush method, you should not have to wait long for the model to dry


The next coat is with Yellow Oxide, using a very dry brush. This final dry brush only hits the fine edges of the model.


=> It should dry very quickly this time, so you will only have to wait a few minutes.


Detail Paint:

I have detailed a high water line along the base of the model, Bright Red, which a common color used on the hull. You can even trace a white line for effect above the red hull paint.


=> Black looks good for the hull too.


Add any fine details to highlight or enhance the character of your model.


Notice the Skull door knob, and light blue port holes. The color in the port holes give the illusion of glass, with reflected white clouds in the windows. Also i painted the hinges iron, and painted the fittings on the guard rail and port holes as brass.
Detail the posts by painting them a solid color, I use Red Iron Oxide, then applied a white finish on the top of each post.


  • Optional black-wash: Many artist like to black-wash their models. This is done with a drop of black acrylic or for the experienced with black ink. The black is mixed with very generous amount of water. I will cover this technique in a separate blog in the future. It is easy to lose the bright colors on your model if do it incorrectly. I would suggest Not black-washing the model at this time. You can always do it later. I did NOT black-wash this model.

The completed paint job:

= > You will notice how applying several coats gives the model the look of a real wood deck, with some areas shaded and others highlighted.


Concluding part 9:
This concludes part NINE of the Pirate Ship project.

In the next installment I will cover how to make masts and sails, then how to add the rigging to your ship.

You are close to completion, and your hard work and patience should show within the details of your ship.

John T Cusack
Www.battlefieldhobbies.org


Posted by Picasa

Sunday, January 4, 2009

Building a Pirate Ship - Part 8

Part 8:

Adding the ships wheel and name plate.

This installment will cover the final steps required before baking your pirate ship.


Specialty parts:
The Ships wheel, and swivel guns are the only specialty items I have added which you may need to order on line, or pick up at your local hobby store.

I would suggest Model Expo online. A site dedicated to model ship and model plane building that carries tons of little piece parts that make building a ship model much easier.

These can be a bit pricy, so watch for close out sales, Model Expo often clears out items like these for $0.99 each. Otherwise the Wheel is $3.99, and the wheel stand is another $3.99 sold seperately.

=> The Swivel guns are $3 to $5 each, watch for close outs on these too.


Add the Swivel gun:
I have customized the swivel gun by adding a small gold bead. The beads you can find at your local craft store. Make sure the center diameter is about the size of a tooth pick.

Cut a tooth pick down to 1/2 inch in length. super glue the tooth pick and the swivel gun onto the bead. Make sure you insert the tooth pick only half way into the bead, so that the swivel gun can also be inserted.

=> I wrapped some thread around the swivel gun side, since the swivel gun post was very small and fragile. The thread gives it some much needed support.

Use the dental compactor to make a deep hole in the gunwale or stern. You can make similar holes in multipule locations so the swivel gun can be repositioned as needed. I have made two holes aft as shown, and two more near the bow of the ship.


Mounting the ships wheel:
Like most other items, I have customized the base of the ships wheel.

Inserting the base alone will not allow the ships wheel to turn freely. I have added a small wood base, then super glued it in place. I have also added threads around the bottom of the base to add support. Glue alone may snap off with useage, however with the thread it will be very strong.

=> If you look closly, you can see two indent marks on the quarter deck where I test fitted the wheel. This will be the area I mount the customized wheel stand.

Mount the ships wheel, on the aft section of the quarterdeck.

If you like, you may mount it on the removable section as well, close to the center rail. This would allow a figure to be placed "at" the wheel.

=> The placement I choose is more for show, so a figure will not fit behind the wheel. This is a trade off you must consider, in my case, having more open deck space took precedence.


Finishing touches for the gun ports:
The gun ports take alot of abuse as you mold and craft the ship, adding parts supports, wood grain details, etc. It is very difficult to keep them shaped, and aligned correctly while handeling the unbaked clay.

At this point, I will reshape each gun port and again REMEASURE each gun port with your "test" deck gun.

I will then add trim around each gun port by rolling out a thin strip of clay. Look closely and you will see the thin line of clay has a ridged texture. I made this by rolling the ridged handle of one of the dental tools to flatten the clay. Then cut the bead of clay even with a clay knife.

Use a flat clay knife to place each tiny piece of the gun port trim.

Take you time with this step, adding each of the tiny pieces around the gun ports.

Since I gave the trim a ridged texture I will not add wood grain, nor will I add rivets.


Important Note: I must stress, that you should remeasure the gun ports with your test deck gun, AGAIN. The deck alignment is critical, so measuring one last time before baking, will save lots of cutting and filing later.

Naming the ship:
At this point in your Ship Building project, you should have a name in mind for your vessel. If you have not yet selected a name, you should do so now. The size and shape of the name plate needs to accomidate the name you choose.


You can shape and cut any design, use a pattern if you must. You can make a pattern by drawing only half of the design. Then fold the paper to trace the other half. Cut out the paper and trace your pattern.

=> My name plate is cut by hand, so it did not turn out "perfectly" semitrical.

Add rivets to help attach and bond the clay to the stern planking. Blend the edges too, to ensure the name plate is attached.
Align the Masts:
Temporarily remove the small posts used to mark the fore and main masts. Insert the full length masts, and line them up vertically. Veiw the model from the front, sides, and from above to ensure the mast are perfectly aligned.
Carefully, remove and reinsert the short doll rods used to temporarily mark the masts.
=> The short masts are used only for baking.
Baking the model:
Place the model on a large cooky sheet, I suggest using a cookie sheet that is no longer used to cook food.
  • Make sure you ask permission FIRST from your spouse or mom before you take thier best cookie sheet.
Baking instructions:
  • Bake Super Sculpey at 275°F (135°C) for 15 minutes per ¼" (6 mm) of thickness. Once the piece is cool, it can be painted with acrylics.

Baking your model is more of an art then a fixed science. The thickness of the clay varies, and you also have a removable section that will not bake as fast as the exposed main deck.

  • I baked my model for 21-minutes, then checked the progress by watching the gunwales and main deck area for a color change.
  • I added 5-more minutes, since the color was not showing any serious signs of darkening. You do not want to overbake, the clay. If the clay starts to darken, then take it out of the oven.
  • Also, I do not preheat the oven, so the "preheat" time, was part of the original 21-minutes. My oven preheats to 275 in 5-minutes, so the extra 5-minutes I added later worked well for this model.
  • Watch the oven closely, but do not keep opening the oven door, that will work against you. Turn on the oven light and watch thru the glass.
  • Important Note: Remember to turn on the fan, and have a parent or adult supervisor the baking of the model if you are a minor.

=> Before you bake, did you recheck the gun port alignment once last time?

Before it cools:
After you take the model out of the oven, set it aside for about 5-10 minutes to begin to cool. However before it cools completely, with a pot holder or oven mitt, slightly twist the bow spar to make sure it is loose.
Also using a pot holder or oven mitt, twist the the two wood masts to ensure they are loose. This will save some effort later, and it will prevent them from bonding into the clay. Leave them in place, just make sure they can be removed.
Warning: Since this done while the model is not yet fully cooled, I suggest you take care not to burn yourself on the cookie sheet.
Concluding the rough build:
After baking let the model cool several hours before moving on to the next section.
This concludes part EIGHT of the Pirate Ship build. In the next installment, I will show you how to prime and begin to paint the model. Then on to adding masts, sails, rigging and those little details that will make your ship a true collectors item.
Since your reading part eight of this build you are clearly interested, so please become a BLOG follow by Clicking on follow and this will help you stay tuned to future projects and postings.
John T Cusack
Posted by Picasa

Saturday, January 3, 2009

Building a Pirate Ship - Part 7

Part 7:

Strengthening the ship.

In previous sections, I have covered adding wood grain, planks and details to your ship.

In this installment, I will demonstrate how to add wood and clay supports that will help strengthen your ship.


Strengthen the gunwales:
Roll a long thick lump of clay about 3-4 inches in length. Cut this into the shape shown in the picture.

This piece will then be sliced in thin layers to add the vertical support between the deck guns.
=> The piece shown is about 3/4 inch in height.


Slice thin pieces and place each support piece on the gunwales, centered between each gun port.

Blend the clay into the side and main deck for each piece.
=> Take care not to damage the wood grain details on the gunwales, deck or outer hull.


Also place a piece left and right of the last gun ports.

Notice how I have cut and adapted one of the support pieces near the base of the steps

=> Detail each piece with vertical wood grain, and a rivet at the top and bottom of the support.


Add wood supports:
You will need several wood coffee stir sticks and small skewers.

Cut off the sharp end of the skewers, since we will not need them for this build.


Create wood posts:
Measure and cut wood posts for supports. You will need only two for this section. My posts are 1-1/4 inch in lenght.

=> In total I will use 26 posts on this ship.

I have added some character to the post by carving a grove at one end and sanding the tip to make it round. Customizing the post is tedious work, yet the finish results are worth the effort.


Add the mast support:
From the coffee stir sticks, measure and cut two trapezoid shaped planks. Cut the angle on the first, then set a second stir stick on the cutting board. Cut the next piece by following the angle of the first trapezoid plank. The result will be two matched trapezoid planks that fit on the face of the foremast post.

Place two of the skewers posts at an angle, gently pushing them into the main deck.

=> Do not push them all the way thru the deck. In case you do push them too far, just remember to sand them a bit after you bake the model. The ship will have a felt bottom, so you do not need to concern yourself too much.

Main mast supports:
Cut more coffee stir sticks as in the last step, with three planks for each side. You may then use round posts as above or use flat craft sticks as shown in the photo.

=> I like using the the flat sticks on the main deck so I have a flush support column for the main mast. This helps with figure placement it you intend to use the ship for historical gaming.
Measure and cut the craft sticks and gently push them into the deck. Again try not to push them all the way thru the deck.
The added wood supports will allow the mast to be removed for game use without the worry of damaging the clay support post.

=> Later in the build after baking, you will remove these wood pieces, then glue them in place after you prime and start to paint the model.


Adding a flag staff:
Using a thick skewer, measure a 4 inch flag pole. I have clipped the sharp tip, then carved a tappered "spear" like shape for the flag pole.

Notice the bottom end is also slightly tappered. This allows easy removal of the flag.

Push the flag pole into the stern.
Do this gently to avoid damage to the stern. A slight twist while pushing works great.

=> You may need to add an interior support post. My flag pole poked into the captains cabin. Remove the flag, add the post, then reinsert the flag pole.
Do not forget to add wood grain details to the new support piece.

Set aside the tappered flag pole for baking and insert a skewer of equal size, without the tappered end.
This way the flag pole hole will accompidate similar flag poles, regardless if they are tappered or not tappered.


Add wood posts:
Carve up a collection of wood posts, you will need 24 more posts, cut 1-1/4 inch in lenght for this step. I'm sure you could find ready made posts if you search the web, or you could just use standard skewers without the custom end.

Either way, custom posts or standard post, you will insert them into the stern, gently pushing and twisting them in place.

Add four left, and four right of the flag staff. Use the dental compactor tool to make a pilot hole for each post. Notice that I insert the stern posts about half of the length.

Add two additional posts, left and right of the quarterdeck. The posts are inserted no more than 1/3 of theier length into the clay.

You could also make these four quarterdeck posts a touch longer, as needed to ensure they are inserted at least 1/2 inch into the clay.

=> Later I will show you how to create a guardrail between these two posts.

Skull Markers:

Gaming Note: This ship has eight posts across the stern, used to mount skull marker beads. The skull beads are used within The Pirates Code - No Quarter Given, Fast Play Rules system 2008 ©, by Battlefield Hobbies. The skull markers are use to track the speed of the ship. Each skull represents 1-knot of speed, which equals 10cm of movement for navigation.

=> You can use the skulls to track damage, speed or just add them for effect.


Add posts for effect:
Add additional post on the gunwale aligned with each vertical gunwale support. Five on each side in total, again inserting them with a slight twist about 1/2 inch into the clay.

=> For my ships, these extra posts are used to tie off ropes, or to store the skull beads when the ship slows below 8-knots of speed.

Add as many additional wood posts or supports to help customize your ship. The extra posts can be for show, or have a specific function as needed.

Historical note:

Ruse de guerre: Most pirate ships would carry an assortment of flags. A common ploy used by pirates would be to raise the national flag of the merchant vessel that they are approaching to trick them into letting down their guard. The pirates would then approach the target vessel, getting in close enought to bring their deck guns into range. The pirates would then host up the Jolly Roger, and firing a warning shot across the bow, thus letting their true intentions be known. The pirates do not want to shoot up thier intended prey, and many times the only shot fired is the warning shot, and Woe to any merchant that ignores the warning. Pirates forced to fight for their spoils, are more likley to offer No Quarter in combat. For this reason, a wise or defenceless merchant vessel would often strike their colors, surrendering to the mercy of the pirates.


  • NOTE: You can make a variety of pirate flags and national ensigns. This will allow you to swap out flags as needed. De Wolven for example, is a Dutch name, so you could add a Dutch VoC or a standard Dutch flag and quickly turn her into a merchant vessel in disguise.


The VoC :
Vereenigde Oost-Indische Compagnie, which translates as United East Indies Company but is also known as the Dutch East India Company.

In the 1600's the VoC dominated navigation and world trade.

=> In a future post I will cover making flags with canvas, or with 110lbs card stock.

Concluding part 7:

This will conclude part SEVEN of the Pirate ship build.


In the next installment I will cover the final steps before baking the clay.

  • Stop by my Flickr or Picasa photo pages for pictures of other completed ships, pirate, privateer and naval vessels.
John T Cusack

Friday, January 2, 2009

Building a Pirate Ship - Part 6

Part 6:

Preparing the hull.

In previous installments, I have walked you through the steps of creating the basic hull, added decks and how to begin the detailing of your ship.

In this installment, I will cover preparing the hull and surface areas for wood grain and planking details.
  • As in previous steps, we begin with a picture of the completed ship. Starting with the end in mind.


Adding the rudder:
A minor add is needed before we can prepare the hull.
Cut out an enlongated trapizod for the rudder. Test fit the piece, them trim as needed to allow the the rudder to fit in the bottom section of the stern.

Use the end of one of your tools to adhere the rudder to the stern. I have pushed three distinct groves on the rudder to give it some character.


Prepare the main deck:
By now your main deck should be relativly smooth. However, at the point the deck meets the gunwale, it is most likely rounded.
With a flat edged tool, create a seam to give better definition to the deck, verse the side/gunwale.
Level off any rough areas, scraping off excess clay in very small amounts.
=> Do not shave to deep, it is beter to simply smooth out the surface verse shaving off too much clay to level out the surface.


Add groves to the hull:
With a flat, round edged tool, make groves to represent the planks on the outside of the ship.
=> You may opt to add the groves BEFORE you add the side/gunwales to your ship. If you do however, you may find that as you work the model the groves loose definition.

I have added four groves along the outside hull. One above the gunports, the next centered across the gunports, then two more below the gunports.


Reshape the gunports:
You will need to touch up the edges of the gunports after you add the groves to the sides of your ship.

=> Square them off, however you do not need spend too much time. In Part 8, I will cover adding trim around the gunports.


Blend the groves:
Your groves on the side of the ship may not be perfectly aligned from one side to the other. At the prow of the ship however, you will want the lines to match. Try as best you can to join the lines, so looking at the prow, the groves on the port and starboard sides line up.

I have left the center line of the prow, without lines. This helps blend the groves into a finished look for the prow.

=>Optional: You may add a figure head to the prow, by carving or by adding wood or metal items to the ship. If you add a soft white metal figure, make sure it can withstand the heat of baking. Otherwise test fit the item, remove it then add it again after baking.


Add the wood grain:
Use your saw tooth blade to add wood grain lines to the outside hull surface. => You may notice, I do not use the exacto saw tooth blade mounted in the exacto handle. Since the saw tooth blade is not sharp, you can use it with or without the exacto handle.

Continue adding wood grain on the main deck, inside gunwales, and all other surfaces.

Add planking:
Use the end of a flat (thin) rounded ended tool to trace plank lines. Be creative and add cross lines for each plank.
I keep the planks about 1-2 inched in lenght.
=> With 1:72 scale, 1-2 inches would equate to 6 to 12 foot planks on a full scale ship.


Add wood peg/rivets:
Using a dental compactor tool add the rivets marks, which represent the wood pegs used to connect the planks. This step is really just for looks.
I use two sizes, pictured to the left, with smallest used on most planks. The larger compactor tool, I use on the ends of planks with a single indentation.

You will notice the ship is no longer the same size as the pattern I started with. This is a result of molding and shaping the hull, deck and side of the ship. The bottom hull/deck is no longer as thick as it was when I started. This however is not a problem, since Super Sculpey clay is very strong when baked. However as build your ship, you should watch for thin spots, adding clay as needed.


Concluding part 6:
This will conclude part SIX of the Pirate Ship build.

In the next installment, I will cover the addition of wood and clay parts designed to strengthen the gunwales and mast supports.

  • Do you have comments, questions? Then please add a comment, and sign up to follow the blog by using the links in the upper right hand corner of the page.

John T. Cusack
Www.battlefieldhobbies.org


Posted by Picasa