Friday, February 13, 2009

Your Pirate Ship Project - Part 12

Part 12

This page is reserved to display your completed or in progress Pirate Ship project. Be the first to send me pictures of your ship, include a description of the ship, and any details you would like to share about yourself for other readers.

Contact me at johntcusack@sbcglobal.net

And now for your viewing pleasure, here is the first ship I created.

The Revenge

The Revenge is the first ship that I had built. She is a 4-Gun Sloop with sails rigged fore and aft, plus a staysail which is secured to the bowspar.


John T Cusack
http://www.battlefieldhobbies.org/

Building a Pirate Ship - Part 11

Part 11

Finishing details:

In this installment I will cover the final details that will turn your ship into the center piece of your collection. The details and finishing touches will make the difference between a common "scratch built" ship and a ship that is a custom made work or art.


Add Accent pieces:
Pick up some beads from your local craft store. Be selective with beads that will accent your ship. I selected a studded gold colored bead.

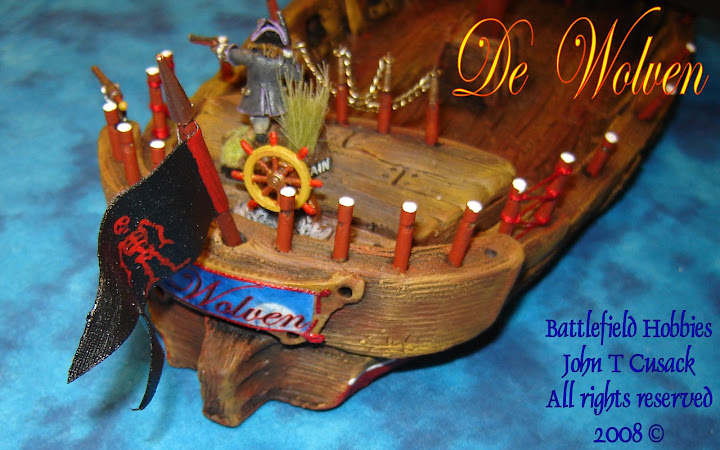
For De Wolven, I placed a gold bead on each end of the Main-topsail and Fore-topsail. Plus one extra on top of the Foremast.


Skull marker beads:
The skull beads can be found on-line, eBay is a good source. For my ships, I add posts on the stern as expained in an earlier posting. The post and skulls are used to mark the speed of your ship in knots. Within The Pirates Code - No Quarter Given Rules System 2009c Battlefield Hobbies, speed is measured in knots. Each 1-Knot is 10cm for each action, with two action for each player in a turn.


Add Chains: (Optional)
Adding chains to your ship gives it a nice touch, yet in most cases is optional. You can use store bought lengths of chain in silver or gold colored or with a dull finish. Or real gold/silver if you have any old broken or unused chains hanging around.

Add the chains for guard rails, anchors or on the bowspar for accent.


Detail the Railing:
In previous installments, several posts had been set into the clay along the edge of the quarter deck.

Now you will complete the railing by adding thread tied off on each post to form the railing.
Using only a clove hitch knot, I have tied off a thread to form the guard rail. I start on one post securing the line with a double clove hitch. Then continue to the next post.

Secure the line:
Once you complete the rail, tie off the thread and add a touch of glue, so the line does not unravel.

The name plate:
For the name plate I suggest using photoshop with a font that will add character to your ship.
De Wolven is a Dutch ship, and will be the Flag ship for a very prestigious Captain from the North. Thus a fancy gothic script was used.

In addition, since I was using photoshop, the text is on a backdrop of a night sky with a full moon rising. A fitting name plate for a Wolf ship.
Glue the photoshop image/text on the name plate, then outline the name with thread so you can not see the boarder of the photoshop printed paper. You can use 110lbs card stock, or plain paper as needed. Either is fine, since the next step will seal and protect the paper.

Dry Fast Top Coat:
Purchase some nail polish top coat, with a nice high gloss finish, you can pick it up at any Walgreens for about $5. The one I used is called "Fast Dry Top Coat" and it is appropriatly named, since it does dry VERY fast.
I applied three coats letting each dry about 10 minutes even though it seemed to dry in minutes. I wanted to avoid a heavy coat that could drip.

Christening the ship:
Christening a ship is a naval tradition that dates back in recorded history to ancient Babylon in the 3rd millennium BC. However the tradition has changed, significantly over the past 5000 years, since sacrificing oxen to pagan gods is frowned on in todays society. The concept however remians the same, before leaving port, ships are blessed and given a name.

The ceremony sorounding the Christening of a new ship is considered an important event. Captains and ship owners take pride in the event, and with the dangers faced at sea, few dare to take to the sea in a ship that has not been Christened. Even many agnostics follow the practice regardless of their beliefs. Be it for "luck" or a divine blessing upon the vessel, the tradition remains.
Signing your creation:

For your ship the final inspection, touch-up paint and the addition of your final signature will complete your ship and "christen" it for service in your fleet.

Once you sign your name, do not continued to "touch-up".

As an artist you must be content to accept any imperfections, and look to any improvements with your NEXT ship build. Once you sign your name, the artwork is complete!!!


The Ship Sets Sail!!!

Send me photos of your build, I would love to see your completed project, and with your permission I will upload the ship for others to enjoy.

Part 12 will be reserved for display of your completed ships projects. Be the first to send me pictures of your ship, include a description of the ship, and any details you would like to share about yourself for other readers.

Thank you for following along, and please add your name to my followers, and stay tuned for future posting.

John T Cusack

http://www.battlefieldhobbies.org/

Tuesday, February 3, 2009

Building a Pirate Ship - Part 10

Part 10:

Masts, sails and rigging.

In this installment of the Pirate ship build, I will cover how to build your masts, sails and rigging.


Cutting the masts:
With either pre-tapered or standard doll rods, measure and cut each of the ships masts. You have the option of purchasing doll rods that are already tapered or you can carve them by hand as I do.

For the De Wolven, two masts are used, with two sails on each mast.
Select a mast dimension that will be strong enough to support the sails and rigging while not looking to big and bulky.
==> I would suggest 1/4 inch to 3/8 inch doll rods. You may cut the mast to height, from 8 inches to 12 inches in length. Size the main mast longer than the foremast and keep them in proportion to the ship, I suggest that you keep the main mast about the same length as the ship.

Adding Spars:
Use large skewer sticks for your spars, cutting the sharp points and tapering both ends slightly. Lay out the spars, and mast in the pattern that they will be assembled.

The length for each cross spar should be in proportion to the mast, with the lower spars longer. For the De Wolven I have prepared two spars for each mast, with the main sail spars slightly longer.


Prepare the Sails:
Using a sheet of artists canvas, measure and cut each sail. For this ship I selected a square rigged sail arrangment.
Fold over about 1/4 to 1/2 inch at the top of each sail. This will later be folded and glue to form a double thick area for sewing. You may use 110lbs card stock paper if canvas is not available. The card stock would not however be as durable as canvas.
=> You should be able to pick up canvas at your local art store. Most sell rolls of canvas cut to order. The canvas used for all my ships is fine Italian canvas which I picked up in Italy while traveling abroad.

Prepare the canvas:
For a more historic ship, you would keep the sails as pure white, or slightly off white. However for a more "Hollywood" approach you may choose to have custom artwork on the sails as with this ship.
If you choose to have white sails, crumble up the canvas and dirty up the sails a bit to give them some character. You may even add battle damage, rips or burn marks.
==>Please, Do not actually burn the canvas.
With sand paper, rough-up the canvas, create a hole, then apply brown/black paint around the worn area. This will make the sail look as if it was in a battle.

Custom Artwork:
Paint any custom artwork on the canvas before attaching them to your spars. For De Wolven, I have made each sail with a common color scheme, with the main sail as the primary artwork with the wolf. Other sails have red, claw marks as if the wolf cut into the canvas.
Be creative with the sails, they will add color and originality to your ship.


Prepare the Hull:
Measure and cut a piece of felt.

Use the type with an adhesive backing. Place the ship on the felt, trace the ships hull and then cut out the shape.
You should cut well inside the line that you traced, so the felt does not overlap onto the sides of the ship.

==> Trim as needed for the right fit.

Attach the sails:
Match up the spars and sails. Spars should be at least 1/4 inch longer on each end then the sail. Fold the top 1/4 inch of the canvas and glue it together. This forms a thick area used to sew. Prepare your thread and use a canvas needle to sew the sails in place. When sewing, use a pattern that you can repeat for each sail. In general I use a pattern with a repeating clove hitch to secure the thread.

NOTE: The pattern used with the De Wolven is rather complex, however if you would like to try it for your ship, here is the explanation that an experienced craftsmen can attempt. Otherwise as stated above, create your own stitch that you can easily repeat for each sail.


The Stitch pattern:
I use a double length thread, with a knot on the end. This way each stitch has two strands of thread. Start in one corner, from the back to conceal the knot. Wrap around the canvas returning to the same hole, dressing the thread over the top. Repeat the stitch, while pulling the thread over the side. The next stitch goes over the spar. Tie off with a double clove hitch knot on the spar. Stitch back through the same hole from the back of the canvas. Stitch around the spar again. Wrap around the thread between the canvas and spar, tying off with a single clove hitch. Begin the next stitch by tying a clove hitch about 3/4 inch down the spar. Repeat as above, starting a new hole about 3/4 inch from the first.

==> Simple right? we'll maybe not so simple. I may double back and do a "sewing 101" post some time in the future. So if your interested, post a comment, let me know this is an area that you need more instruction. I have dozens of Photos which I have not used for this build, that illustrate every detail of the project.

Attach each of the sails:
Sew your stich pattern for each of the spars, attaching each of the matching sails.
Leave the extra thread at the ends of each spar/sail, you can cut them off later, or use them directly for any rigging you plan to add.


Attach the spars:
Using a canvas needle, make a hole from the back in the center of the sail close to the edge. Make a few stitches while wrapping around the canvas before you tie off the spar.


When tying the spar to the mast, wrap the thread around the mast in an organized pattern.

Then with each completed stitch, thread the needle back through the canvas. To tighten the connection between the mast and the spar, you should wrap the thread around the threads that join the two pieces together. Firmly securing the connection, pulling any loose threads tight.

Easier said then done:
I realize that this is a difficult step to illustrate with photos and even more difficult explain in text. You may need to use trial an error on your stitch patterns and thread/connections. Practice on a spare piece of spar/canvas if needed until you find a pattern that works for you.

Attach each Sail:
Repeat for each sail, spacing each spar as designed.
Rigging: The basic rule for rigging is to keep it simple. Assuming the ship is designed for gaming, less rigging is better. Add a few strands as needed to give the ship some character.


==> I would suggest that as a minimum requirement you should secure a line to the end of each bow spar in a triangle pattern, connecting the end of the spar to the mast about an inch above the spar.


The rigging that you add, helps add support, to your masts. If the ship is used for gaming, it will be removed many times during the life of the ship.

You want to be sure that the rigging is tight, yet not strunk like a banjo or it may break with usage.

==> As you tie off each spar and sail connecting them to the mast, and to each other, they will help secure the sails/spars and prevent them from moving.


Creating your Pirate Flag:
If you must, you can use photo shop and print out pirate flags for your ship on 110lbs card stock.

==> I however, being an artist, must paint each one by hand. It's in my nature, even though photo shop flags look rather nice if done correctly.
Lay out a piece of canvas, cut extra banners for the mast and paint each with the pirate flag pattern of your choice.

Once the flag drys, glue the back side and fold the flag over a painted scewer stick, used as your flag pole.
Do the same with the two banners, making sure you wrap around a stick to keep the hole open.
==> you see the banner on the table, ready to be added to the mast.
Concluding part 10:
This will conclude part TEN of the Pirate Ship Build. In the next installment, I will demonstrate the step required to finish the details that will make your ship a completed work of art.
Stay tuned, and by all means if you would like to commission me to build a ship for your pirate fleet, then please let me know.
John T Cusack
Posted by Picasa

Friday, January 9, 2009

Building a Pirate Ship - Part 9

Part 9:


Prime and paint the ship.


In this installment I will cover the steps required to prime and paint your Pirate Ship model.


Preparing the model:
Once the model is fully cooled after baking, you will need to take a few minutes to clean up the model.
  • Remove the temporary mast, and test fit the permanent mast. You may need to drill out the hole a bit, but do not enlarge the hole. Later you will slightly tapper the bottom of the mast.
  • Remove and glue any loose posts, on the gunwales, allow time to dry before priming. Use Allene's Fast Grab Tacky Glue for best results.
  • Remove the mast support posts, assuming they are loose. My support post had been loose, so I opted to set them aside in a egg cart like storage container.
  • Remove the Captains wheel and set aside. Remove the wheel stand if it is loose, if you used string as I did, it should not be loose. Take care not to paint it too much with the base coat.
  • Sand the bottom of the model if any wood pieces are showing.
  • Clean any rough clay, as a result of the wood grain effect. Do this by running your fingers across the model surface. You will find that little tiny pieces of clay will come loose. You do not need to use tools or sand paper for this step.
Remove the Quarterdeck:
With very little effort the removable quarterdeck should come loose. You may need to use a fine edge clay knife along the seams. Do this very carefully taking your time. Hopefully you will not need to cut to free up the quarterdeck area. If you must cut, be carefully not to snap the exacto blade, Sculpey is stronger then you may guess.

Test fit the deck guns:
Test fit your deck gun at each gun port. Mark any areas that need filing. File any gun ports as needed. Again, hopefully you will not have to cut or file too much.


Prime the model:

Let any glue dry as required.

Use acrylic paint to prime your model. I prefer black, applied with a large stiff bristle brush. You may use spray flat acrylic if you like, however make sure you have proper ventilation and a painters mask.

Prime the model and allow time to dry. I generally allow the model to sit overnight.


Spot prime as needed:
Inspect the model and spot prime any areas that are not fully covered. You want the black to fully cover all those little cracks and rivets.

Allow to dry as needed.

=> Note the storage container that holds the wheel, bow spar, flag staff, and support posts for each of the masts.


Select your color scheme:
Select your ships color scheme. For example, a Ghost ship could be gray and weathered, a Naval war ship could be very well kept, with fresh bright colors.


Pirate ships as a rule, would fall somewhere in between. I like to make most pirate ships, "fairly" well kept, yet showing signs of wear and tear or even some battle damage.

I have selected to have this ship, well kept with a darker blend of wood and bright highlights to contrast the dark wood. Dark sails and red and black rigging, with the custom Wolf artwork on the sails.


Apply the Base coat:
As a general rule, most artists will not start with models finish color. In fact, most artist will agree that you should begin two or three shade darker. With a black primer, by intent I must apply more coats to bring "light" back into my model. The contrast of light and dark is what gives your model life.

I selected Burnt Umber as my base coat.


Using a dry brush, touch the edge of your paint and then apply the base coat on the hull and decks. Do not try to cover every rivet hole and crack, most of the little cracks and rivets should remain black. Let the model dry!


Dry Brush:
Using your base coat again, dry brush the model. Keep the brush dry and hit only the main surface areas. Since your first base coat had to overcome the black primer, using the same color for a second coat will make the model appear as if you used a lighter color. Let dry!


Detail posts and supports:
Prime and base coat any support pieces. Glue the support pieces in place. Since the piece are small, I prefer to glue them in place after priming and base coating them.

=> You can later add details to the posts and support if you wish to have the support pieces stand out from the wood of the main deck.


Prepare the Bow Spar:

The bow spar and flagstaff should be lighly snaded before painting them. Appling paint even in thin layers will make it dificult later to insert and remove the bow spar. It is best to sand the tappered end now, then apply the prime and base coat.


=> Often times I use a different base coat on the flag staff and bow spar. In this case the base coat is Red Iron Oxide, applied with an even coat of paint.


Add a lighter shade for highlights:

At this point, your model should have dark areas and some that are visually lighter. I have used a Red Iron Oxide to lighten the model. First with a mix of Burnt Umber, then a second coat with just Red Iron Oxide, applied with a very dry brush. Burnt Sienna works good too in place of Red Iron Oxide.


Again keep the brush dry. Both coats are only lightly dry brushed on the main deck areas, the bow and top edges of the hull.


Let dry.


With the dry brush method, you should not have to wait long for the model to dry


The next coat is with Yellow Oxide, using a very dry brush. This final dry brush only hits the fine edges of the model.


=> It should dry very quickly this time, so you will only have to wait a few minutes.


Detail Paint:

I have detailed a high water line along the base of the model, Bright Red, which a common color used on the hull. You can even trace a white line for effect above the red hull paint.


=> Black looks good for the hull too.


Add any fine details to highlight or enhance the character of your model.


Notice the Skull door knob, and light blue port holes. The color in the port holes give the illusion of glass, with reflected white clouds in the windows. Also i painted the hinges iron, and painted the fittings on the guard rail and port holes as brass.
Detail the posts by painting them a solid color, I use Red Iron Oxide, then applied a white finish on the top of each post.


  • Optional black-wash: Many artist like to black-wash their models. This is done with a drop of black acrylic or for the experienced with black ink. The black is mixed with very generous amount of water. I will cover this technique in a separate blog in the future. It is easy to lose the bright colors on your model if do it incorrectly. I would suggest Not black-washing the model at this time. You can always do it later. I did NOT black-wash this model.

The completed paint job:

= > You will notice how applying several coats gives the model the look of a real wood deck, with some areas shaded and others highlighted.


Concluding part 9:
This concludes part NINE of the Pirate Ship project.

In the next installment I will cover how to make masts and sails, then how to add the rigging to your ship.

You are close to completion, and your hard work and patience should show within the details of your ship.

John T Cusack
Www.battlefieldhobbies.org


Posted by Picasa

Sunday, January 4, 2009

Building a Pirate Ship - Part 8

Part 8:

Adding the ships wheel and name plate.

This installment will cover the final steps required before baking your pirate ship.


Specialty parts:
The Ships wheel, and swivel guns are the only specialty items I have added which you may need to order on line, or pick up at your local hobby store.

I would suggest Model Expo online. A site dedicated to model ship and model plane building that carries tons of little piece parts that make building a ship model much easier.

These can be a bit pricy, so watch for close out sales, Model Expo often clears out items like these for $0.99 each. Otherwise the Wheel is $3.99, and the wheel stand is another $3.99 sold seperately.

=> The Swivel guns are $3 to $5 each, watch for close outs on these too.


Add the Swivel gun:
I have customized the swivel gun by adding a small gold bead. The beads you can find at your local craft store. Make sure the center diameter is about the size of a tooth pick.

Cut a tooth pick down to 1/2 inch in length. super glue the tooth pick and the swivel gun onto the bead. Make sure you insert the tooth pick only half way into the bead, so that the swivel gun can also be inserted.

=> I wrapped some thread around the swivel gun side, since the swivel gun post was very small and fragile. The thread gives it some much needed support.

Use the dental compactor to make a deep hole in the gunwale or stern. You can make similar holes in multipule locations so the swivel gun can be repositioned as needed. I have made two holes aft as shown, and two more near the bow of the ship.


Mounting the ships wheel:
Like most other items, I have customized the base of the ships wheel.

Inserting the base alone will not allow the ships wheel to turn freely. I have added a small wood base, then super glued it in place. I have also added threads around the bottom of the base to add support. Glue alone may snap off with useage, however with the thread it will be very strong.

=> If you look closly, you can see two indent marks on the quarter deck where I test fitted the wheel. This will be the area I mount the customized wheel stand.

Mount the ships wheel, on the aft section of the quarterdeck.

If you like, you may mount it on the removable section as well, close to the center rail. This would allow a figure to be placed "at" the wheel.

=> The placement I choose is more for show, so a figure will not fit behind the wheel. This is a trade off you must consider, in my case, having more open deck space took precedence.


Finishing touches for the gun ports:
The gun ports take alot of abuse as you mold and craft the ship, adding parts supports, wood grain details, etc. It is very difficult to keep them shaped, and aligned correctly while handeling the unbaked clay.

At this point, I will reshape each gun port and again REMEASURE each gun port with your "test" deck gun.

I will then add trim around each gun port by rolling out a thin strip of clay. Look closely and you will see the thin line of clay has a ridged texture. I made this by rolling the ridged handle of one of the dental tools to flatten the clay. Then cut the bead of clay even with a clay knife.

Use a flat clay knife to place each tiny piece of the gun port trim.

Take you time with this step, adding each of the tiny pieces around the gun ports.

Since I gave the trim a ridged texture I will not add wood grain, nor will I add rivets.


Important Note: I must stress, that you should remeasure the gun ports with your test deck gun, AGAIN. The deck alignment is critical, so measuring one last time before baking, will save lots of cutting and filing later.

Naming the ship:
At this point in your Ship Building project, you should have a name in mind for your vessel. If you have not yet selected a name, you should do so now. The size and shape of the name plate needs to accomidate the name you choose.
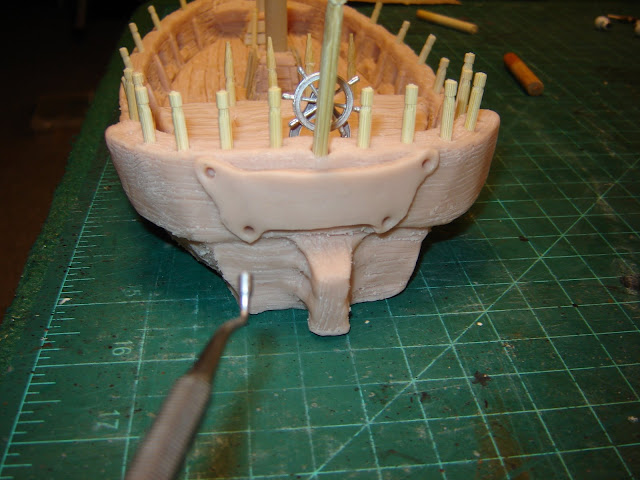

You can shape and cut any design, use a pattern if you must. You can make a pattern by drawing only half of the design. Then fold the paper to trace the other half. Cut out the paper and trace your pattern.

=> My name plate is cut by hand, so it did not turn out "perfectly" semitrical.

Add rivets to help attach and bond the clay to the stern planking. Blend the edges too, to ensure the name plate is attached.
Align the Masts:
Temporarily remove the small posts used to mark the fore and main masts. Insert the full length masts, and line them up vertically. Veiw the model from the front, sides, and from above to ensure the mast are perfectly aligned.
Carefully, remove and reinsert the short doll rods used to temporarily mark the masts.
=> The short masts are used only for baking.
Baking the model:
Place the model on a large cooky sheet, I suggest using a cookie sheet that is no longer used to cook food.
  • Make sure you ask permission FIRST from your spouse or mom before you take thier best cookie sheet.
Baking instructions:
  • Bake Super Sculpey at 275°F (135°C) for 15 minutes per ¼" (6 mm) of thickness. Once the piece is cool, it can be painted with acrylics.

Baking your model is more of an art then a fixed science. The thickness of the clay varies, and you also have a removable section that will not bake as fast as the exposed main deck.

  • I baked my model for 21-minutes, then checked the progress by watching the gunwales and main deck area for a color change.
  • I added 5-more minutes, since the color was not showing any serious signs of darkening. You do not want to overbake, the clay. If the clay starts to darken, then take it out of the oven.
  • Also, I do not preheat the oven, so the "preheat" time, was part of the original 21-minutes. My oven preheats to 275 in 5-minutes, so the extra 5-minutes I added later worked well for this model.
  • Watch the oven closely, but do not keep opening the oven door, that will work against you. Turn on the oven light and watch thru the glass.
  • Important Note: Remember to turn on the fan, and have a parent or adult supervisor the baking of the model if you are a minor.

=> Before you bake, did you recheck the gun port alignment once last time?

Before it cools:
After you take the model out of the oven, set it aside for about 5-10 minutes to begin to cool. However before it cools completely, with a pot holder or oven mitt, slightly twist the bow spar to make sure it is loose.
Also using a pot holder or oven mitt, twist the the two wood masts to ensure they are loose. This will save some effort later, and it will prevent them from bonding into the clay. Leave them in place, just make sure they can be removed.
Warning: Since this done while the model is not yet fully cooled, I suggest you take care not to burn yourself on the cookie sheet.
Concluding the rough build:
After baking let the model cool several hours before moving on to the next section.
This concludes part EIGHT of the Pirate Ship build. In the next installment, I will show you how to prime and begin to paint the model. Then on to adding masts, sails, rigging and those little details that will make your ship a true collectors item.
Since your reading part eight of this build you are clearly interested, so please become a BLOG follow by Clicking on follow and this will help you stay tuned to future projects and postings.
John T Cusack
Posted by Picasa