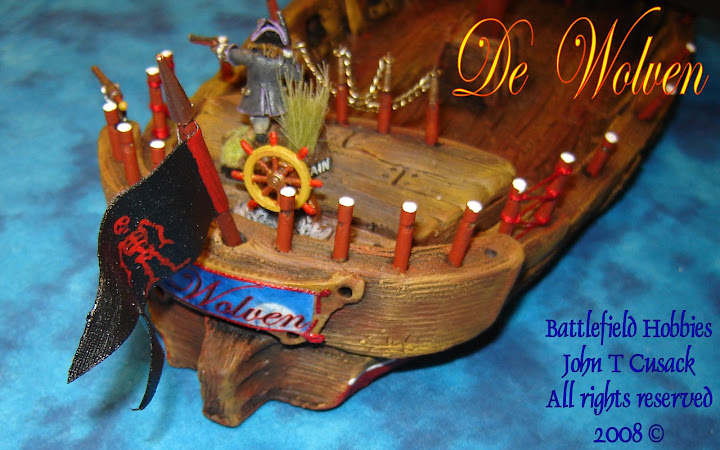
Finishing details:
In this installment I will cover the final details that will turn your ship into the center piece of your collection. The details and finishing touches will make the difference between a common "scratch built" ship and a ship that is a custom made work or art.

Add Accent pieces:
Pick up some beads from your local craft store. Be selective with beads that will accent your ship. I selected a studded gold colored bead.
For De Wolven, I placed a gold bead on each end of the Main-topsail and Fore-topsail. Plus one extra on top of the Foremast.
Skull marker beads:
The skull beads can be found on-line, eBay is a good source. For my ships, I add posts on the stern as expained in an earlier posting. The post and skulls are used to mark the speed of your ship in knots. Within The Pirates Code - No Quarter Given Rules System 2009c Battlefield Hobbies, speed is measured in knots. Each 1-Knot is 10cm for each action, with two action for each player in a turn.
Add Chains: (Optional)
Adding chains to your ship gives it a nice touch, yet in most cases is optional. You can use store bought lengths of chain in silver or gold colored or with a dull finish. Or real gold/silver if you have any old broken or unused chains hanging around.
Add the chains for guard rails, anchors or on the bowspar for accent.
Detail the Railing:
In previous installments, several posts had been set into the clay along the edge of the quarter deck.
Secure the line:
Once you complete the rail, tie off the thread and add a touch of glue, so the line does not unravel.
De Wolven is a Dutch ship, and will be the Flag ship for a very prestigious Captain from the North. Thus a fancy gothic script was used.
In addition, since I was using photoshop, the text is on a backdrop of a night sky with a full moon rising. A fitting name plate for a Wolf ship.
Dry Fast Top Coat:
I applied three coats letting each dry about 10 minutes even though it seemed to dry in minutes. I wanted to avoid a heavy coat that could drip.
Christening the ship:

The ceremony sorounding the Christening of a new ship is considered an important event. Captains and ship owners take pride in the event, and with the dangers faced at sea, few dare to take to the sea in a ship that has not been Christened. Even many agnostics follow the practice regardless of their beliefs. Be it for "luck" or a divine blessing upon the vessel, the tradition remains.

For your ship the final inspection, touch-up paint and the addition of your final signature will complete your ship and "christen" it for service in your fleet.
Once you sign your name, do not continued to "touch-up".
The Ship Sets Sail!!!

Send me photos of your build, I would love to see your completed project, and with your permission I will upload the ship for others to enjoy.
Part 12 will be reserved for display of your completed ships projects. Be the first to send me pictures of your ship, include a description of the ship, and any details you would like to share about yourself for other readers.
Thank you for following along, and please add your name to my followers, and stay tuned for future posting.
John T Cusack


No comments:
Post a Comment