Adding the ships wheel and name plate.
This installment will cover the final steps required before baking your pirate ship.

Specialty parts:
 The Ships wheel, and swivel guns are the only specialty items I have added which you may need to order on line, or pick up at your local hobby store.
I would suggest Model Expo online. A site dedicated to model ship and model plane building that carries tons of little piece parts that make building a ship model much easier.
These can be a bit pricy, so watch for close out sales, Model Expo often clears out items like these for $0.99 each. Otherwise the Wheel is $3.99, and the wheel stand is another $3.99 sold seperately.
=> The Swivel guns are $3 to $5 each, watch for close outs on these too.
Add the Swivel gun:
 I have customized the swivel gun by adding a small gold bead. The beads you can find at your local craft store. Make sure the center diameter is about the size of a tooth pick.
Cut a tooth pick down to 1/2 inch in length. super glue the tooth pick and the swivel gun onto the bead. Make sure you insert the tooth pick only half way into the bead, so that the swivel gun can also be inserted.
=> I wrapped some thread around the swivel gun side, since the swivel gun post was very small and fragile. The thread gives it some much needed support.
Use the dental compactor to make a deep hole in the gunwale or stern. You can make similar holes in multipule locations so the swivel gun can be repositioned as needed. I have made two holes aft as shown, and two more near the bow of the ship.
Use the dental compactor to make a deep hole in the gunwale or stern. You can make similar holes in multipule locations so the swivel gun can be repositioned as needed. I have made two holes aft as shown, and two more near the bow of the ship.
Mounting the ships wheel:
 Like most other items, I have customized the base of the ships wheel.
Inserting the base alone will not allow the ships wheel to turn freely. I have added a small wood base, then super glued it in place. I have also added threads around the bottom of the base to add support. Glue alone may snap off with useage, however with the thread it will be very strong.
=> If you look closly, you can see two indent marks on the quarter deck where I test fitted the wheel. This will be the area I mount the customized wheel stand.
 Mount the ships wheel, on the aft section of the quarterdeck.
 If you like, you may mount it on the removable section as well, close to the center rail. This would allow a figure to be placed "at" the wheel.
=> The placement I choose is more for show, so a figure will not fit behind the wheel. This is a trade off you must consider, in my case, having more open deck space took precedence.
Finishing touches for the gun ports:
 The gun ports take alot of abuse as you mold and craft the ship, adding parts supports, wood grain details, etc. It is very difficult to keep them shaped, and aligned correctly while handeling the unbaked clay.
At this point, I will reshape each gun port and again REMEASURE each gun port with your "test" deck gun.
I will then add trim around each gun port by rolling out a thin strip of clay. Look closely and you will see the thin line of clay has a ridged texture. I made this by rolling the ridged handle of one of the dental tools to flatten the clay. Then cut the bead of clay even with a clay knife.
Use a flat clay knife to place each tiny piece of the gun port trim.
 Take you time with this step, adding each of the tiny pieces around the gun ports.
 Since I gave the trim a ridged texture I will not add wood grain, nor will I add rivets.
Important Note: I must stress, that you should remeasure the gun ports with your test deck gun, AGAIN. The deck alignment is critical, so measuring one last time before baking, will save lots of cutting and filing later.
Naming the ship:
 At this point in your Ship Building project, you should have a name in mind for your vessel. If you have not yet selected a name, you should do so now. The size and shape of the name plate needs to accomidate the name you choose.
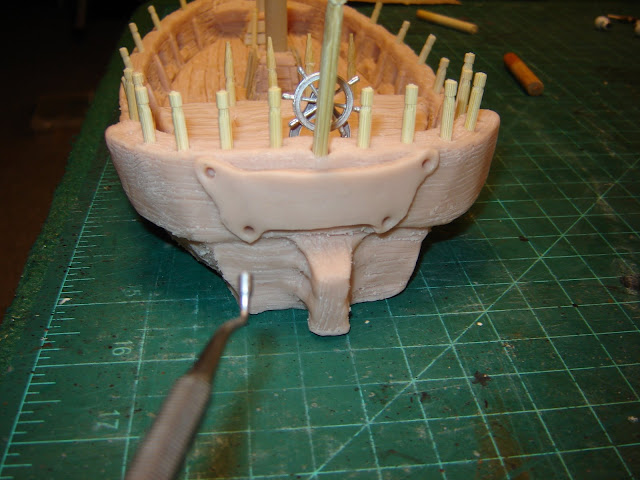 You can shape and cut any design, use a pattern if you must. You can make a pattern by drawing only half of the design. Then fold the paper to trace the other half. Cut out the paper and trace your pattern.
 => My name plate is cut by hand, so it did not turn out "perfectly" semitrical.
Add rivets to help attach and bond the clay to the stern planking. Blend the edges too, to ensure the name plate is attached.
Align the Masts:
 Temporarily remove the small posts used to mark the fore and main masts. Insert the full length masts, and line them up vertically. Veiw the model from the front, sides, and from above to ensure the mast are perfectly aligned.
 Temporarily remove the small posts used to mark the fore and main masts. Insert the full length masts, and line them up vertically. Veiw the model from the front, sides, and from above to ensure the mast are perfectly aligned.
 Carefully, remove and reinsert the short doll rods used to temporarily mark the masts.
=> The short masts are used only for baking.
Baking the model:
Place the model on a large cooky sheet, I suggest using a cookie sheet that is no longer used to cook food.
- Make sure you ask permission FIRST from your spouse or mom before you take thier best cookie sheet.
Baking instructions:
- Bake Super Sculpey at 275°F (135°C) for 15 minutes per ¼" (6 mm) of thickness. Once the piece is cool, it can be painted with acrylics.
Baking your model is more of an art then a fixed science. The thickness of the clay varies, and you also have a removable section that will not bake as fast as the exposed main deck.
- I baked my model for 21-minutes, then checked the progress by watching the gunwales and main deck area for a color change.
- I added 5-more minutes, since the color was not showing any serious signs of darkening. You do not want to overbake, the clay. If the clay starts to darken, then take it out of the oven.
- Also, I do not preheat the oven, so the "preheat" time, was part of the original 21-minutes. My oven preheats to 275 in 5-minutes, so the extra 5-minutes I added later worked well for this model.
- Watch the oven closely, but do not keep opening the oven door, that will work against you. Turn on the oven light and watch thru the glass.
- Important Note: Remember to turn on the fan, and have a parent or adult supervisor the baking of the model if you are a minor.
=> Before you bake, did you recheck the gun port alignment once last time?

Before it cools:
After you take the model out of the oven, set it aside for about 5-10 minutes to begin to cool. However before it cools completely, with a pot holder or oven mitt, slightly twist the bow spar to make sure it is loose.
Also using a pot holder or oven mitt, twist the the two wood masts to ensure they are loose. This will save some effort later, and it will prevent them from bonding into the clay. Leave them in place, just make sure they can be removed.
Warning: Since this done while the model is not yet fully cooled, I suggest you take care not to burn yourself on the cookie sheet.
Concluding the rough build:
After baking let the model cool several hours before moving on to the next section.
This concludes part EIGHT of the Pirate Ship build. In the next installment, I will show you how to prime and begin to paint the model. Then on to adding masts, sails, rigging and those little details that will make your ship a true collectors item.
Since your reading part eight of this build you are clearly interested, so please become a BLOG follow by Clicking on follow and this will help you stay tuned to future projects and postings.
John T Cusack


No comments:
Post a Comment